Showing posts with label Dubai Diaries. Show all posts

Wednesday, 8 June 2022


                                             Pulley Wheel Garden Decor


On one of our trips back in 2017, I was so fascinated to see how people creatively used old household things and recycled/repainted/ redecorated or upcycled in some form of decor item.

One of them was our age old pulley wheels, used in Indian houses to draw water from the wells used as a wonderful garden decor item.

Early September 2017, during one of the carpentary works, which involved fitting of shelves in one of our wardrobes there were 2 scrap pieces of wood which was leftover. I requested the person to leave it for me, as I would find some use for it in future.

After the terrible Summer, when apart from few hardy desert plants, nothing else survives the desert heat, Winter was a season that was a visual treat to the eyes starting with the regular petunias and marigolds and periwinkles and zinnias etc adding splashes of colour everywhere. Apart from the individual gardens, the efforts taken by the municipality to beautify the place with respect to public gardens as well as along the sides of the main arterial roads is highly commendable. Getting to see so much of color around us in a desert was like a breath of fresh air. So October- April was when most of the garden lovers look forward to bring some color to their gardens, inspite of knowing that these plants won’t survive past April and hence a trip to the local nursery was something that was one of the Items in our “To Do” list.

Going through my craft supplies recently I came across these wooden pieces, which reminded me that I should do something with it for my garden decor.


My next mission was to find the wheel pulley. After visiting several hardware stores around, I was unable to find this particular type of pulley. Finally I requested the person who came for some handyman work to let me know in case he knew of any shop which sold these kind. He didn’t guarantee but said that he would try. I was convinced that this project would remain pending until the next time we travelled to India as back in India, there wouldn’t be any difficulty finding this pulley. But to my joy, the handyman messaged me saying that he was able to find it .


I immediately started working on the wooden pieces. After giving couple of coats of paint  to the wooden pieces, fixed the pulley, painted 2 galvanized buckets and hung them with jute rope from the pulley . 


Then added some seasonal plants to the buckets and ta da... my pulley garden decor is ready!!


Wednesday, 2 February 2022


For all you wonderful readers out there who like my work and were eager to know more about my DIYs and were wondering where I was all this while, let me start out by apologizing for my absence.  I have been wanting to share all of my creations with all of you out there but couldn't due to personal reasons including a relocation to my homeland after 13 long years. Now that I am back, join me as I take a trip down my memory lane into the wonderful world of Art, Crafts,  Journaling, Upcycling,  Recycling and the list is endless... R U READY?? Then LETS GO...


                                                                                 Part -2

                                                TRIBAL DOOR WITH EXPRESSIONS


What does the word  RACK mean? One of the dictionaries gave me this meaning :

Rack- A framework or stand in or on which to hold, hang, or display various articles: a trophy rack; a rack for baseball bats in the dugout; a drying rack for laundry.

Hence the word SHOE RACK simply means a framework for holding/hanging the shoes and it meant the same for me too until its doors broke in a way it couldn’t be mended/put back together.

For quite a long time my shoe rack was simply kept open displaying both the fresh and the soiled shoes belonging to each one of us, with the broken door kept aside assuring myself that it would be used on a later occasion.

Everyday the broken door reminded me of its existence reinforcing that it was high time that either I should be working on it or simply find a place down the garbage chute. My mind was not agreeing even a bit to the idea of simply pushing it down the chute and that it when i thought that I better do something about it.

After a lot of pondering, I decided that what could be better than using terracotta again. But what exactly was the question now. That was when I arrived at the conclusion that what could be better that depicting different human facial expressions.

The steps that I followed is laid down:

·        I used the decoupage technique to cover the frame portion of the door. Allowed it to dry for 24  hrs.

·        Secondly I started making out tiny pots using air drying terracotta (Pls. refer to Part 1 on how to use air drying terracotta).

·        Next  I stuck the eyes and pinched the opening of the pots to give expressions to the lips. Allowed it to dry for 24 hrs. Then used acrylic paints to paint the dried pots. Left it to dry thoroughly for an hour.

·        Next was to fix the stand or tiny shelves on which these pots were to be displayed. Here I have used small 1.5 inch * 1.5 inch MDF pieces, which was then tied on to metal wires on both ends and twisted to tighten it up.

·        Next I marked the places where these pieces would be fixed on the door.

·        Placed the board on the marked places and pulled out the metal wires behind the door through the tiny rectangular cavities on the door and twisted it tightly so that it didn’t move out of its place.

         Now I stuck the terracotta pots, the mouth of the pot facing me.


Looking at the door the frame still looked quite empty. So I again used some terracotta figurines  and placed it randomly here and there. 


The ladles and pots you see here are also made of terracotta. The ladder is made out of toothpicks to give it the look of an exterior of a tribal home typical to India.


Finally any guesses what that sun you see right on top left hand is made of??


.

.

.

.

.

.

.

.

.

Still no idea?

.

.

.

.

.

.

.

.

.

.

.

Its the flower formation that you see on top of the whole coconut . Picked it up from the coconut section from a supermarket on one of my weekly shopping sessions. And voilà

my tribal door with expressions  is ready!!!


How do like my work??

Do drop in your comments in the comment box. Would love to hear from all of you J

Stay tuned for more ....


Saturday, 22 December 2018

          The Dry White Tree


When mamma found an uprooted dried tree close to a construction site, she couldn’t help but admire the beauty this lifeless object had. Beautifully developed roots and carefully trimmed branches, guess the summer had taken a toll on something which once stood tall and strong!


Mamma couldn’t imagine the fate of this beauty once  the garbage truck picked her up, either to be chopped or burned . So Mamma brought her home and made room for her in Mamma’s favorite place; her Garden. With her head held high and her arms wide, she taught the tiny tendrils to climb, changing her attire from green to yellow to brown. She was a retreat for the birds. Amongst the flowers and birds and bees and butterflies, there she stood happily for 2 summers, a spring and a winter before Mamma decided to make her a part of the Season of Joy.

After a bath and all dressed in white, she looked nothing less than an angel. With babies pitching in to help mamma DIYing and accessorizing her, here she comes, calm and serene by the day and shining by the night, bringing joy to one and all!


Merry Christmas to y’all!!

Accessories used :- DIY Paper crafts angels, wooden snowflakes and icicles made with wooden beads from mamma’s old handbag. Tissue roll santa and elf, store bought pinecones

DIY Courtesy:- Mamma and babies


**Would love to hear from you, just drop in a comment or two!! 

Friday, 15 September 2017

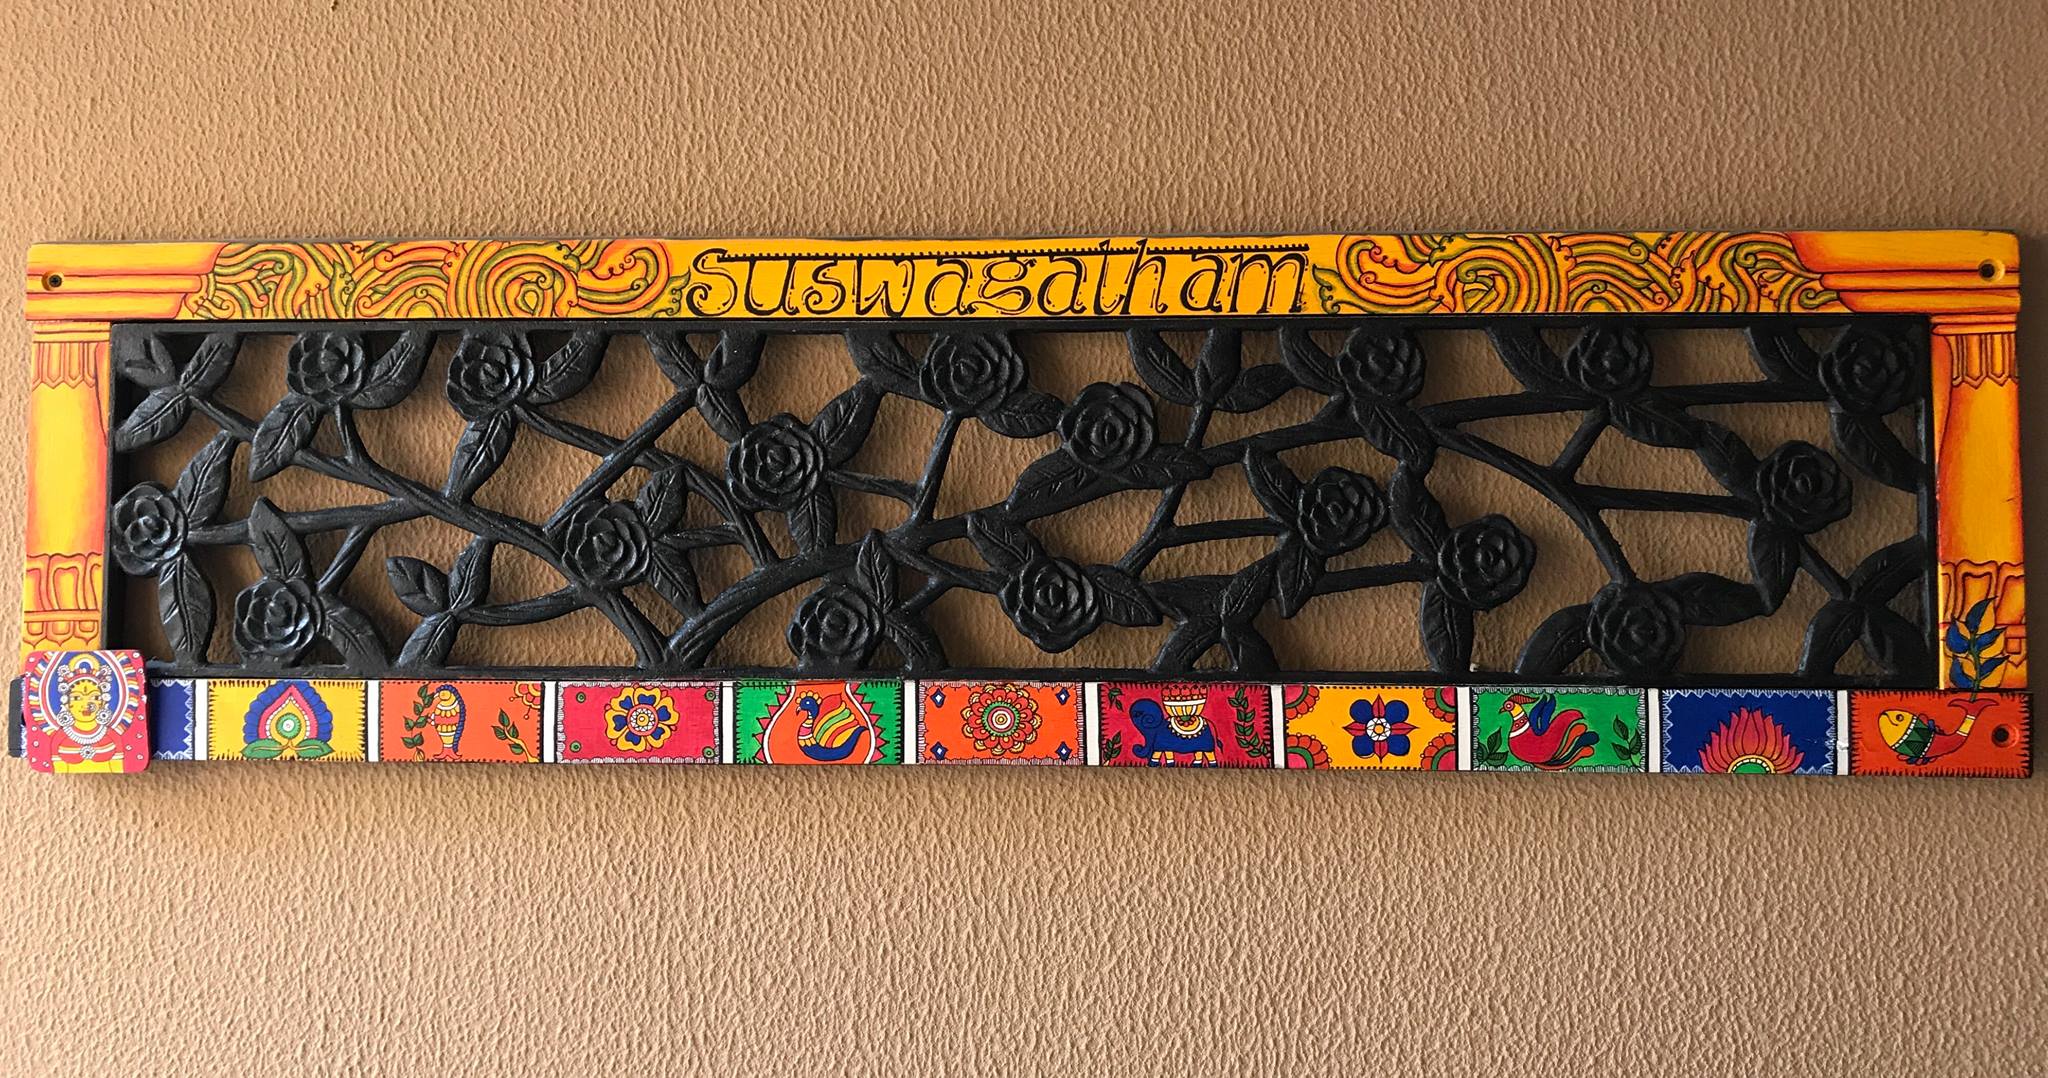
 ATITHI DEVO BHAVA!


According to our Indian Culture, Atithi (Guest) is like god and must be welcomed into our homes with love and respect.

When we settled for our present house after a lot of house hunting , I noticed in one of the balconies, resting against the wall, was a broken garden bench with its wooden frame back rest weathered and chipped,  the iron side panels badly rusted and left by the old tenants to be discarded.


Mesmerized by the beauty of this piece, I requested the maintenance people who were on the painting work before handing over the house to us, not to throw it away and that I would find a use to it.

After over two months of pondering over what to do with it, I couldn't wait to get back from our vacation to start working on it.

As it was left outside , I don't know for how long by the previous tenants, it was covered in dust and cobwebs.


First thing to do was give it a nice scrub with a wet cloth. Then gave it a fresh coat of white paint. I painted the metal part with an anti-rust outdoor paint in black. The reason I decided to give it black, was so that it would give the surrounding design, which is a combination of Kalamkari, Madhubani & Kerala Mural motifs, a visual pop.


After adding some of my personal touches to it, my Ethnic Welcome Board is ready to welcome all the athithis into our abode 😊.


Don't forget to drop in a line or two, would love to hear from all of you too!!

See you soon with another creation and the story behind it!


Wednesday, 11 May 2016


DIY Upholstery Project

         (Ethnic Dining Chairs)


With two boys around, chair and sofa cushions becomes an experimental object mainly to test the sharpness of a pencil and also a partial blackboard and not to forget the occasional milk and food spill, getting the cushions upholstered at a furnishing shop every now and then is an expensive option. Hence began my upholstery project couple of years ago which is continuing to date. In an effort to make the room look brighter initially, I had chosen a silverish white fabric with brown floral motifs on it to match my pallete which was basically brown. Of late I've been thinking about adding some color to the furnishings.


Fabrics were never of much interest to me. So with whatever little knowledge I had, a recent trip to couple of cloth stores left me in awe about the different types of fabrics available starting from various types of silks to brocades to everything under the sky, the innumerable shades of different colors so much so that I ended up buying lots of pieces of different kinds of fabrics.


Back home initially I thought, I would sew it by hand, as I neither knew how to sew nor did I have a sewing machine. Inspite of several attempts by my Mom-in-law (who is extremely good at sewing) to teach me how to sew, I somehow felt it was simply not "My Cup of Tea". I felt it was extremely difficult for me to learn it as it confused me to the core and hence always stuck with mending small stuff by hand. And now the thought of making the chair covers made me feel drained wondering how will I ever finish this.

Recently, I came across a portable table top mini sewing machine which claimed to be helpful for beginners like me and cost wise also was very reasonable. I somehow convinced myself and went ahead and bought it.
Couldn't wait to open the pack out and try it myself. And finally all excited when I opened the pack, I find the sewing machine with the knobs and buttons labelled in a foreign language. I reach out for the Instruction Manual and to my shock I find the Instruction Manual too in the same language 👀

Tried to recollect how amma had demonstrated on her machine and after a lot of trial and errors, finally figured as to how it works. Finally I tried sewing together the pieces of silk and brocade for my project. My stitches were not perfect at all initially but there has been an improvement from where I started. Need lots and lots of practice before I get it all perfect but am so so happy that l finally managed to understand d basics of sewing and made my long pending project so so easy.....my mini machine is one of my prized possessions now!!


Hope to see u all with another DIY project very soon! Until then Happy Decorating!!

Thursday, 14 April 2016

Ethnic Wooden Blocks Display


The wooden blocks used for the block printing always caught my eye for their sheer intricately carved patterns, leaving me wondering how the artisans carved such intricate details small pcs of wood. A visit to any of the craft shops meant scanning for such beautiful pcs. My joy knew no bounds when the craft safari started including block printing kits for kids. I was using them more than my kids. 


The first Block Printing Kit that I bought from Ann @ The Craft Safari, Dubai included a tree and a parrot motif that I used to print on the motifs on the outer part of my Miniature Ganesh Mandir. Since then I have seen beautiful pieces in the TCS collection .The moment the new collection of blocks were put up on The Craft Safari page, I knew that they were the pcs that I was looking for.


On one of my shopping sprees, I had bought a wooden photo frame from a craft store. 


Getting back I knew I needed to do something colourful.  Started off painting the thick outer paper panel  with bright colours in acrylic. Initially I was trying a hand at doodling which eventually turned up being a combination of doodling, mehendi and Madhubani motifs. 


I have used permanent markers here. Once dried, I put the glass back on and put it away for later use.  That later use came up to be after 6 months now since my purchase. 😀

In the meantime I was on a lookout for something appropriate for my now ready frame, which reminded me of my very own India every time I looked at it 


What could be more Indianish that our very own elephant and peacock. The tree completed the look. Couldn't wait to get it home. 


Gave the carvings a fresh coat of white paint to make it stand out. I initially tried sticking them in the three slots without the glass, but then realised that since the hand painted panel was made of paper, it would get dusty in the long run. Hence to  protect it from the dust and grime, I decided to put the glass back on the panel and then stuck the wooden blocks on top of the glass to give it a 3D look.


Tadaaaaa..... My Indianised Wooden Block Wall Hanging!!!


Hope you all enjoyed it! Happy crafting!


Do drop in a line or two. Would love to hear from all of you :)!!

Thursday, 11 June 2015

BIRDS  OF  PARADISE


A good friend bought a set of 7 birds from one of the home decor stores. She wanted to get them painted in some bright colours to give it a "BIRDS OF PARADISE" look. This is how they looked initially


Her adorable little daughter wanted to paint some herself and so she went ahead and painted 4 birds and I was commissioned to paint the remaining 3.
 
When she approached me, she only had one condition that it should look very bright and colourful and gave me all the liberty to do it my way. 

After a lot of thinking, I used 5 colours namely red, yellow, blue, green, orange. Since I love working with acrylic paints because of it nature being firstly a quick dry medium and secondly having a beautiful glossy finish, I have purely used acrylic paints here. For the intricate patterns, I have used fine liners and permanent markers. Traditional motifs have been used here, some influenced by the traditional Madhubani Art. This was the final outcome:


Since the entire piece had a lot of colour, I chose to keep the sides black with white floral motifs on it. A closer look at the base :
  

So bringing you BIRDS OF PARADISE with a traditional twist....


Wot do u think about it??Looking forward to hear from you....

See you soon with another form of artwork........


Monday, 23 March 2015

Working with Terracotta

                            
                                                                        Chapter 1

Miniature Figurines    
                              
Jam, Sauces and Pickles everywhere....

Everytime a jam bottle got over, I used to wonder what it could be used for rather than the usual way to store masalas (Indian Spices), which I have used myself and  I am sure most of our mothers and grandmothers would be doing the same when a glass bottle got empty, as it is scientifically proven that cheaper plastics react with the masalas and hence is not considered a safe way to store the spices. Again got everything cleaned up, dried and stored away.

Like most of the mothers my day too starts with making breakfast for the family, packing the lunch boxes, getting the kids ready for school, breakfast time with my husband and once he goes to office, starts “ MY CRAFTY TIME” which goes on for couple of hours until the kids are back from school.
It was during one of those CRAFTY mornings that I stumbled upon a terracotta pack that was purchased earlier. On one of my usual crafty hunts, I came across a pack of air drying terracotta in one of the leading chain of supermarkets. I had picked it up thinking I might have some use with it on a later occasion.Wanted to try out sculpting at least once. So I started out making the face first. As it started to take form, I realised that I requires quite a lot of patience and every process should be done as fast as possible, as the clay was an air drying one and once it started drying it had a tendency to become hard and would just chip off. So I tried to keep it moist enough spraying water every now and then to prevent hardening and I was pretty happy with the outcome of each feature. Once the face was over I realised that it had come out to be a miniature face and that I couldn’t make it stand upright and that it needed a base. That was when I was reminded of the tiny bottles that were cleaned and stored away . What could be better than a glass bottle with a miniature figurine on the top.  So I started working on the lid of the bottle. Smoothened the base out on the bottle lid with some more clay and yaaaay there my figurine stood upright. But when i closed the bottle it looked quite empty.
On one of the earlier craft purchases, I had bought some shells and beads and also some colourful stones and hence I tried stuffing my bottle with it. After stuffing the bottle, i have sealed the bottle with the clay and once it was dry I painted the figurine with acrylic paints. After drying use little arty glue and stick the satin ribbon/ lace around and tie a neat bow and the end result :

SEE IT FOR YOURSELF!


Sorry for not having the working stills as I forgot to take pictures of each process. But I am sure by reading the process all of you will be able to do this miniature figurine on your own.

Come along and lets try creating a MINIATURE FIGURINE.

Things you will need :
Air drying terracotta
Old Jam/ Sauce bottle washed and dried thoroughly
Beads/ Shells/ Stones for stuffing
Acrylic paints
Satin Ribbon for the bow

Method:
Take a lemon sized ball from the terracotta pack and keep the remaining pack sealed in an air tight container to prevent drying out. Knead the clay well . Pinch out three small balls approx.0.5 cms. This will be used for making the eyes and lips. Slowly start forming a face by slightly rolling the ball to form a slightly oblong shape, flattening it. Now pinch out another 1 cm clay out and start rolling to form strands of hair. Stick the strands on the head using water. Add some curls to the tip for the female figurines. Once the hair is done , let us proceed to the eyes. Flatten the small balls out and press a toothpick horizontally in the middle to show the eye lids. Now stick the eyes in place. For the eyebrows roll out two tiny balls and roll out long. Stick above the eyes. For the nose pinch out a tiny ball of clay and roll it to form a line thick on one end and thinning it to  the other end. Now stick the nose, thinner side up and thick down( this would be the nostrils) between the eyes. Make two pin-head holes using the toothpick for the nostrils. Take the remaining tiny ball for the lips. Roll such that it is a bit elongated and press it down. Pinch on both sides to give the shape of the lips. Press the toothpick horizontally between the lip to form the upper and the lower lip. Now press gently with the toothpick on the middle upperside of the lip to give it the shape of the upper lip. Pick it up gently from the work surface with a flat knife and stick under the nose. Now the face is done. Press it firmly on the bottle lid using some crafters glue and water. Now roll out a thick piece and place under the face. Merge it with the bottom of the face and the base of the bottle lid to form the neck of the figure. Smoothen it out to give a smoother look. U could add collar to the dress/ shirt at this point. Allow the figurine to dry for 24 hrs. Now fill the bottle to the brim with Beads/ Stones/Shells. Close the lid tightly on the bottle. Roll out a thick piece of clay and seal the bottle lid. Make sure you smoothen out the clay so that it looks like an extension to the dress of  the figurine. Allow to dry completely. After drying paint the features using acrylic colours. Tie a bow around to finish the look.

SOME OF MY WORKS


Here I have used an empty olives pickle bottle for the man and a Nescafe bottle for the lady. Blue pebbles are used to depict the man’s shirt. String from my son’s old water bottle is used to show the belt and brown and clear pebbles to show his pants. The lady is wearing a red and white polka dress.


Husband’s perfume bottle for the man and a jam bottle for the lady!


                                                         An Indian Couple!


Singer


School Kids


70's is back!!
                                                                   
                                               
                                                                      Tribal Boy

                     
                                                                  ABSTRACTS:


                                                        Masai Mother and Child


Let me know what you think about my work. Stay tuned for more of my art works.